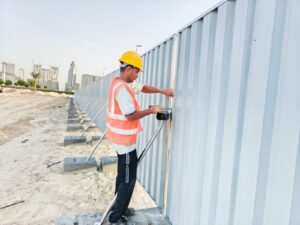
Installation of GI Temporary Fencing

High-Quality Materials
We use only the highest quality GI temporary fencing panels, which are pre-galvanized to resist rust and corrosion, ensuring long-lasting durability even in harsh weather conditions. Our fencing panels are designed for stability and strength, capable of withstanding environmental stresses and providing reliable security.
We provide professional installation services for (Galvanized Iron) GI temporary fencing, ensuring secure and efficient setup for your site. Our expert team handles every aspect of the installation, from site assessment and planning to the actual assembly of the fencing panels and secure positioning with sturdy bases and clamps. Whether it’s for construction sites, events, or any other temporary enclosure needs, our installation service guarantees a quick and reliable solution, meeting all safety and regulatory standards.
Installation of GI Temporary Fencing
Installing GI (Galvanized Iron) temporary fencing is a practical solution for securing construction sites, events, and other areas that require temporary barriers. At UAE Building Material, we provide high-quality GI temporary fencing and offer guidance on its proper installation. Here’s a step-by-step guide to help you with the installation process:
1. Plan and Measure
Survey the Area: Determine the perimeter where the fencing will be installed. Measure the length and height required to ensure you order the correct amount of fencing materials.
Mark Positions: Use stakes and string lines to mark where the fence panels and posts will be placed.
2. Prepare the Site
Clear the Area: Remove any debris, rocks, or obstacles from the installation site to ensure a smooth setup.Check for Utilities: Ensure there are no underground utilities or obstructions where the posts will be installed.
3. Install Fence Posts
Dig Post Holes: Use a post hole digger or auger to create holes for the fence posts. The depth and width of the holes should be sufficient to secure the posts firmly.
Set the Posts: Place the posts into the holes, ensuring they are vertical and evenly spaced. Use a level to check alignment.
Secure the Posts: Fill the holes with concrete or compacted soil to stabilize the posts. Allow the concrete to cure as per the manufacturer’s instructions.
4. Attach Fence Panels
Position Panels: Once the posts are securely set, position the GI fence panels between the posts. Ensure they fit snugly and align properly.
Secure Panels: Attach the panels to the posts using appropriate fasteners or clips. Check that the panels are level and securely attached.
5. Install Gates (if needed)
Position Gates: If your temporary fencing requires gates, install them according to the manufacturer’s instructions. Ensure the gates swing open and close smoothly.
Secure Hinges and Latches: Attach hinges and latches to the gates and posts, checking for proper operation and security.
6 . Inspect and Adjust
Check Stability: Ensure all posts, panels, and gates are secure and stable. Make any necessary adjustments.
Final Inspection: Verify that the entire fencing system is aligned, level, and meets your project’s requirements.
7. Maintenance and Safety
Regular Checks: Periodically inspect the fencing for any signs of wear, damage, or instability. Address any issues promptly to maintain security and safety.
By following these steps, you can ensure a successful installation of GI temporary fencing, providing effective and durable protection for your site. For high-quality GI temporary fencing and professional installation assistance in Dubai, contact UAE Building Material. Our team is ready to support you with expert advice and top-notch products.


